7 Days of Thrift Shop Flips
12 August
Last year I shared seven days worth of thrift shop flips in honor of National Thrift Shop Day and they were some of my most popular posts so I'm doing the same thing this year... starting today!!
National Thrift Shop Day is Thursday, August 17th, 2017.
This is my project for Day 1 of 7 Days of Thrift Shop Flips.
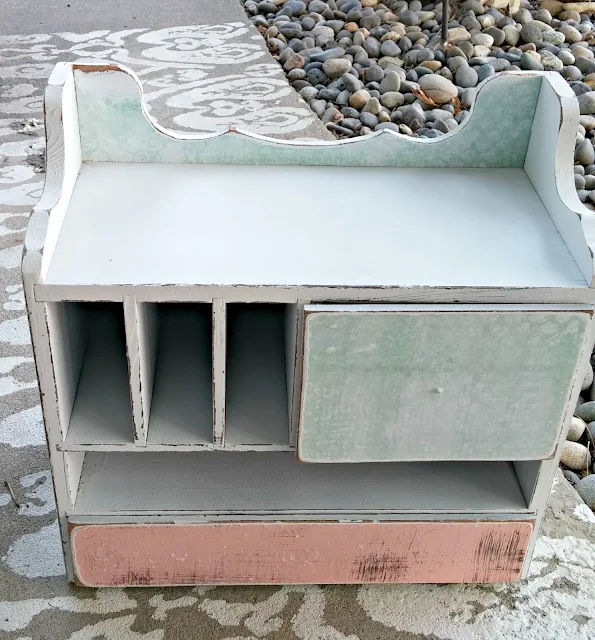
This little mail sorter wasn't always cute though! Here is the before.
I've had this for at least 5 years... honestly, I don't know why it took me so long to give it a makeover!
You can see it was very dirty and just not so cute!
This was my inspiration for this piece. When I saw this beautiful boho cabinet in the Summer 2015 issue of Bohemian Home it was love at first sight!
I thought I could get the same kind of look with some scrapbook papers and paint.
I cleaned it up and then gave it a quick coat of white spray paint and distressed the edges a little bit.
I picked out three pieces of scrapbook papers that went well together and had a bohemian flair.
The sides got this fun floral.
I used Mod-Podge to adhere the papers to the cabinet. The key to avoiding bubbles and wrinkled papers is to put a coat of the Mod-Podge on both the surface you are covering AND the back of the paper. Then use something flat to smooth it out and press it down evenly.
Once it dried I used an X-acto knife to trim the papers even with the edges of the cabinet. I find it easier to do it this way than trying to cut the paper to the same size and shape before adhering it to the cabinet.
I used a pretty aqua colored paper for this back piece and one of the drawers.
And the pink paper I chose on the bottom drawer.
And pink paper inside the drawer with the aqua front!
I also stenciled the sides of the top drawer.
And then to get that same aged, worn appearance from my inspiration piece... I sanded the hell out of it!!
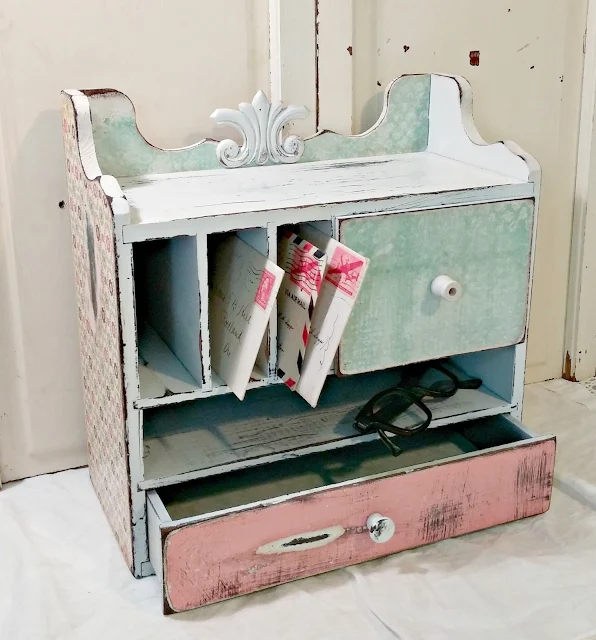
One drawer was missing a knob so I rummaged around looking for something and finally settled on a wooden candle cup from my craft supplies.
While I was looking for a knob, I found this little wood applique that came off a piece of furniture I refinished once. I thought it would add to the eclectic feel.
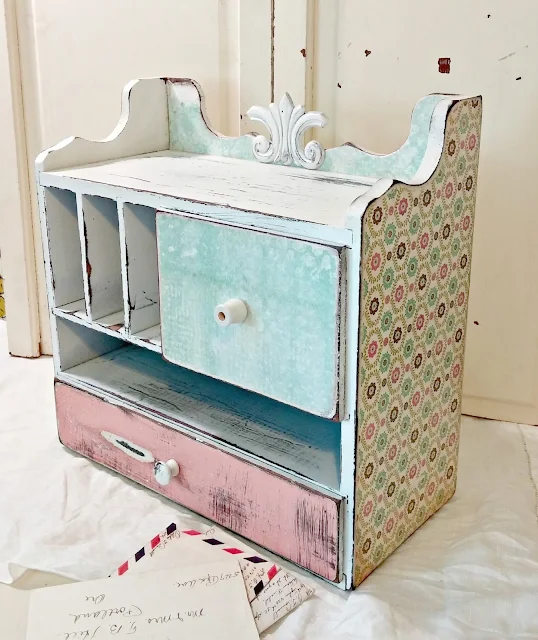
And here is the finished little mail sorter!
I thought about putting some paper on the top but instead opted for just heavy distressing. I thought it would be more durable in case something damp was ever set on top. I did put a clear coat over the top of everything though.
The mismatched (yet coordinating) papers and mismatched drawer knobs help with the eclectic look I was going for.
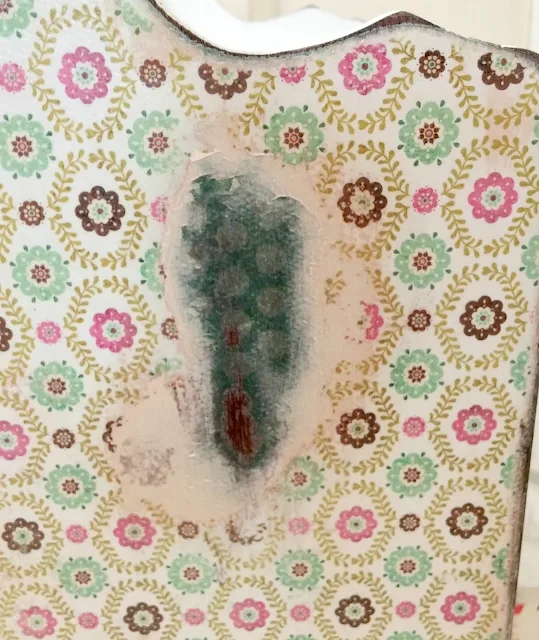
I wanted to show you the happy accident that happened on the side. See where I sanded right through the paper? Well, that part was on purpose...
... but this paper was double sided, it had green polka dots on the other side and as I was sanding it I started to notice the polka dots showing through! I guess the Mod-Podge somehow helped achieve this effect!
What do you think?!
From sad, dirty, and boring to happy and eclectic!
Be sure to come back tomorrow to see what happens with a couple of these little dolls for day 2 of 7 Days of Thrift Shop Flips!

National Thrift Shop Day is Thursday, August 17th, 2017.
This is my project for Day 1 of 7 Days of Thrift Shop Flips.
This little mail sorter wasn't always cute though! Here is the before.
I've had this for at least 5 years... honestly, I don't know why it took me so long to give it a makeover!
You can see it was very dirty and just not so cute!
This was my inspiration for this piece. When I saw this beautiful boho cabinet in the Summer 2015 issue of Bohemian Home it was love at first sight!
I thought I could get the same kind of look with some scrapbook papers and paint.
I cleaned it up and then gave it a quick coat of white spray paint and distressed the edges a little bit.
I picked out three pieces of scrapbook papers that went well together and had a bohemian flair.
The sides got this fun floral.
I used Mod-Podge to adhere the papers to the cabinet. The key to avoiding bubbles and wrinkled papers is to put a coat of the Mod-Podge on both the surface you are covering AND the back of the paper. Then use something flat to smooth it out and press it down evenly.
Once it dried I used an X-acto knife to trim the papers even with the edges of the cabinet. I find it easier to do it this way than trying to cut the paper to the same size and shape before adhering it to the cabinet.
I used a pretty aqua colored paper for this back piece and one of the drawers.
And the pink paper I chose on the bottom drawer.
Then I used the opposite papers inside each drawer... the aqua paper inside the drawer with the pink front...
And pink paper inside the drawer with the aqua front!
I also stenciled the sides of the top drawer.
And then to get that same aged, worn appearance from my inspiration piece... I sanded the hell out of it!!
One drawer was missing a knob so I rummaged around looking for something and finally settled on a wooden candle cup from my craft supplies.
While I was looking for a knob, I found this little wood applique that came off a piece of furniture I refinished once. I thought it would add to the eclectic feel.
And here is the finished little mail sorter!
I thought about putting some paper on the top but instead opted for just heavy distressing. I thought it would be more durable in case something damp was ever set on top. I did put a clear coat over the top of everything though.
The mismatched (yet coordinating) papers and mismatched drawer knobs help with the eclectic look I was going for.
I wanted to show you the happy accident that happened on the side. See where I sanded right through the paper? Well, that part was on purpose...
... but this paper was double sided, it had green polka dots on the other side and as I was sanding it I started to notice the polka dots showing through! I guess the Mod-Podge somehow helped achieve this effect!
What do you think?!
From sad, dirty, and boring to happy and eclectic!
Be sure to come back tomorrow to see what happens with a couple of these little dolls for day 2 of 7 Days of Thrift Shop Flips!

Posted by: Tania | Little Vintage Cottage
at 12 August
Tag:
DIY & Crafts


WOW what a difference. It is so cute now.
ReplyDeleteWhat a transformation--you did a smashing job!! I always love seeing your thrifting finds and what you do with them. You have such great ideas!
ReplyDeleteI love it! Great job!
ReplyDeleteThanks!
ReplyDeleteThank you Vikki!
ReplyDeleteThanks Sharon!
ReplyDeleteThis is absolutely gorgeous!!! I'll have to remember the double-sided paper shows it's other side when sanded almost all the way through. I have a few wood pieces around that need me! I'm glad it turned out for you. You must be so proud. Wonderful!
ReplyDeleteTania, wow! I love it...it is truly amazing.
ReplyDeleteTotally adorable! I love it! Especially that decal thing on top really adds a lot! Are you keeping it, or putting in your Etsy shop?
ReplyDeleteThanks! I think the Mod-Podge has something to do with it showing the back of the paper... I guess with Mod-Podge you are gluing it to a surface so when you sand through the front of the paper the back is glued down and shows before you get completely through that to the bare wood!
ReplyDeleteThanks Linzey!
ReplyDeleteTania
Thank you Florence. As much as I love how it turned out it will be going to the Etsy shop :o)
ReplyDeleteTania
YEAH! This is the most wonderful time of the year. I was hoping you would do the 7 days of thrifting again this year and you are! Oh happy day! Love the box, its so boho perfect.
ReplyDeleteYay, I didn't know if anyone would even remember that I did this last year! I'm glad you like this project, I do too... day 2 I'm on the fence about... but hey, we can't have 100% project success all the time right?!
ReplyDeleteTania
I love that! It turned out darling and I LOVE the use of scrapbook paper.
ReplyDeleteThank you JoElle!
ReplyDeleteTania
Oh wow! Turned out fabulous!
ReplyDeleteThank you!
ReplyDeleteWow Tania, I absolutely love what you did with this little cabinet. The scrapbook papers work beautifully together and I love the time-worn look you gave this piece - beautiful!
ReplyDeleteThanks Marie!
ReplyDeleteI love the result of the mail sorter cabinet. It turned out so cute. Thank you for sharing at Grandma's House link party. Pinned.
ReplyDeleteThank you so much Amy!!
ReplyDeleteTania
Tania, I love your little boho cabinet and the happy accident!!
ReplyDeleteThank you for sharing at Create, Bake, Grow & Gather this week. I'm delighted to be featuring this project at tonight's party and pinning too!!
LOVE this! It looks like something you'd pay $$$ at Anthropologie. Makes me want to redo my plain (super boring) wood jewelry box. Visiting from Create Bake Gather and Grow party.
ReplyDeleteAww, thank you so much Kerryanne!
ReplyDeleteTania
Oh, you should definitely try something similar on your jewelry box! It does kind of look like something Anthropologie would carry... I didn't even think of that! Thank you!
ReplyDeleteTania